
Wednesday, April 18, 2012
Thursday, March 29, 2012

Sunday, November 27, 2011
Quilt Sizes for reference
Moments after pawing through your stash looking for just
the right fabrics you are confronted with the question about what size
quilt you are going to make. If you are like me you are flying by the
seat of your pants but a couple of rough estimates never hurt!
Finished size Quilts
Crib size - 50x53
Twin- 65x88
Dorm length Twin - 65x93
Double - 80x88
Queen - 86x93
King - 104x93
Cali-King 100x97
Baby play quilt- 36x36
Sofa snuggle quilt - 66x76
Sunday, August 14, 2011
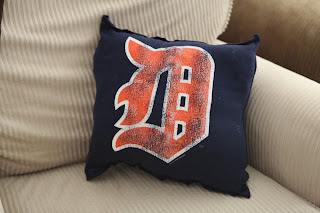
Upcycled T-shirt Pillow
So, I am FAMOUS for spilling things on my clothes, Im not good with food I guess. Well I have this super comfy t-shirt that I stained so I decided to make a pillow out of it. I chose to keep the edges out for a rough/ care free edge, then I didn't have to worry about closing it.

Thursday, March 3, 2011
Another Rag Quilt
I used some receiving blankets to make this blanket. I love that they coordinate so well and are something different then what you get in JoAnns. This particular set of blankets is from Target.
I iron the blanket first, then fold in half. With the 6 1/2 inch square, I can get 8 squares (16 total because its folded).

Because the fabric is folded when cut, the squares are perfect together with the right sides facing out

I sew from one corner to the next of every square. Its easiest to just do one after another and cut them apart after. Once they are all done and cut apart, repeat to complete the x.


Line the squares up in the pattern you like.


Pin each row together, keeping all edges facing facing out. Sew along this seam.


Iron down the seams flat


Pin two rows together keeping the seams all facing out (total of 4 layers of fabric) making sure to line up and pin the seams.

Cut along each seam making sure not to cut the thread in the seam. Wash, dry, and its finished.


Flannel rag burp cloths - tutorial
1. First I traced a burpie bib style burp cloth from aden and anis. Then I cut out a front a back piece of fabric free hand.

 2. Line them up, right sides facing out and pin
 3. Sew around the edge, I use about 1/2" seam


I used a navy thread on the bottom and red on top
 4. Cut slits in the outside to create the frayed look, making sure not to cut through your seam
 5. Wash
 Another version


 2. Line them up, right sides facing out and pin
 3. Sew around the edge, I use about 1/2" seam

I used a navy thread on the bottom and red on top
 4. Cut slits in the outside to create the frayed look, making sure not to cut through your seam
 5. Wash
 Another version

Subscribe to:
Posts (Atom)